This lockdown period is for some people the opportunity to restore their board before returning to the water soon. This is the case of Kaelim who explains his problem on our forum and asks for advice on the procedure to follow to carry out an effective repair.
“Hello,
Because of lockdown, I decided to repair my board myself which has a water intake on a fin box, and two delaminations at the tail and at the nose. It is true that I can leave my board with a shaper, but I am more than 250 miles away from the first shaper. I had time to order the resin on the internet and fiber …. here I go. ”
Here is Bear’s answer about the water on fin box:
“Hello,
let’s take the two problems apart. So concerning the fin box.
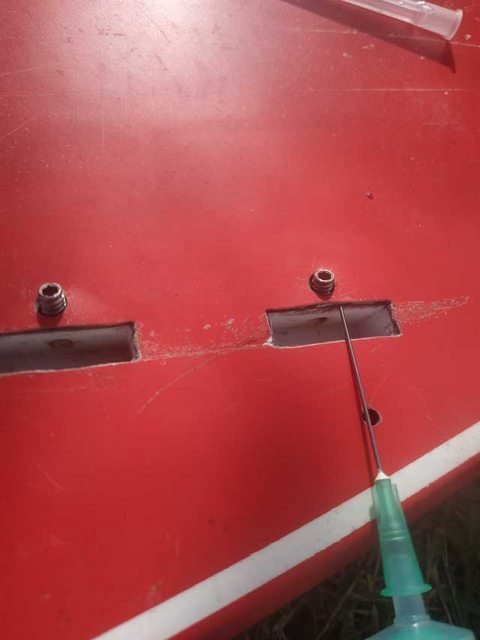
1/ It is necessary to sand in the form of a scarf (bowl) all the area of the box and the surroundings. The box has a shape of 8. You should see the whole box appear in white. The objective of this sanding is to remove all the fiber that covers the box and to finish this scarf with a nice gentle slope on the healthy fiber around.
2/ You inspect the box. Is it still well glued to the EPS foam, or it is moving? From the image, I think it is well glued (no mark of the outline of the box in the lamination). If the box can move, it must be changed; so the job of a pro.
3/ You let it dry in the shade and by applying toilet paper on the EPS that you have just open.
4/ When it is perfectly dry, you fill the holes with plasticine, the 4 holes (fin holes and screws holes). You cut the plasticine tabs close to the level of the box (no bump). You open the vent screw on the top of your board and repair the board in a room without light and at constant temperature. If the EPS heats, it will degas air and raise your lamination with bubbles.
5/ You protect the entire unsanded area with tape.
6/ You put 3 layers of fiberglass in about 6oz, 10% larger than the scarf.
So, you prepare your pieces of fiber which you put on a cardboard on your board nearby.
You prepare your epoxy resin.
You apply a thin layer of resin with a brush over the entire scarf.
You feed all the holes generously to let the air going out.
Then you put the first layer of fiber.
You let the resin go up in this layer without doing anything for 1 minute.
You apply a thin layer of resin with a brush.
You put the second layer and wait 1 minute.
You apply a thin layer of resin with a brush.
You put the third layer and wait 1 minute.
You apply a thin layer of resin with a brush.
7/ You watch for 1 hour that no bubble takes off your lamination. If a bubble appears, you press it with your brush to make it disappear through the fiber.
8/ 24h after, you sand perfectly flat until peeling off the protective tape, with sanding papers 80/120/180/240 and in this order. It is a sign that you have sand to level zero of the bottom when the tape peels off. Fundamental.
9/ You put a protective tape again and you apply a layer of epoxy resin over your lamination to make a hot coat.
10/ 24h after you sand the hot coat with 120/240/400 sand paper until you make a perfect finish.
11/ With a Dremel you will open the holes that you had plugged with the plasticine. To avoid slipping and damage the box, guide your Dremel on a ruler.
If you do not have a Dremel, you drill a few holes with a driller in the plasticine area and you just cut very gently with a large cutter blade. Then you finish with a micro sanding block that you make by sticking smooth sandpaper on a little piece of wood (that doctor use for your tongue, for example).
12/ You remove all the plasticine.
13/ You still have to paint properly. For that you will mask the areas that need to be protected and apply a dozen very thin layers. Rush will be your worst enemy. It is better to have 10 thin layers than three thick ones that will remain soft.
This is what a board maker like us and many others would do and charge you a few tens of euros. It is laborious and precise work, but without difficulty if you respect this method step by step.
Thank you.
PS: all syringe-based solutions are a bad idea. Very experienced board makers can use it, but for a non professional it is the best way to make a big mistake (to burn your EPS, and your house !!!) for a poor result.
Advisor: l’Ours and GONG-GALAXY.


1 comment
Just done my Karmen FSP2 adter I cracked the polyester gel coat on a rock. But there was no real drama as stated in video, the composite underneath was undamaged. Still very strong and water tight.
Feathered back the cracked gel coat with a dremmel tool.
Used gorilla glue epoxy, filled with glass micro spheres to give it the grey colour of the original gel coat.
Used plastic film, to mold the epoxy / glass mix to the shape of the board. Left overnight to cure.
Removed film, and sanded back the small amount of excess epoxy with finest grade of sand paper.
Polished with dremmel tool.
Masked up and painted pin lines with red automotive touch up paint wwhich was a veryclose match to original.
You can hardly tell where the gel coat has been replaced. It cost a few euros and took about an hour to fix.