


Launch the flight
Your first flight will be the result of a succession of correctly executed steps. With practice, these will happen naturally. Our complete How To covers the 7 steps you need to acquire to launch your first flight and all the following ones.

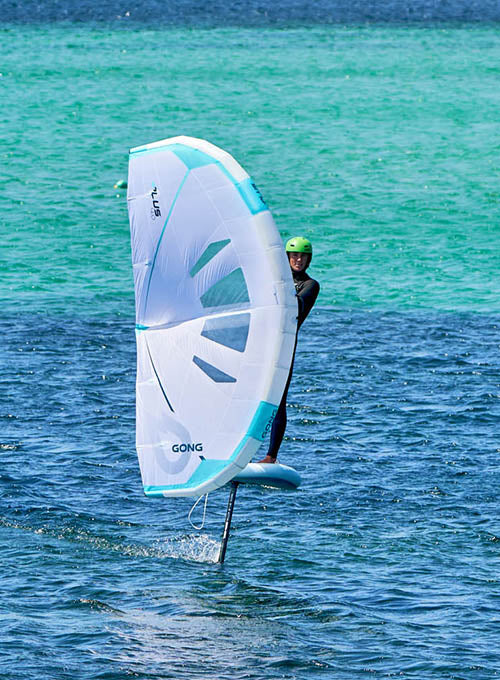
Wing foiler : Jules, GONG team rider, with a Plus, HIPE Perf and X-Over foil.
Today we are focusing on the key points of step 6: launch the flight.
- Naturally, you will have beared off while sheeting in to stand up. Nickel.
- The wing has gone from an umbrella position to a half inclined screen. The central strut is at 45° from the axis of the wind and from the vertical. Your back hand is significantly lower than your front hand. This means that your front hand is significantly higher than your back hand. And it’s exactly this height differential between the hands that will give you all the keys to piloting your wing. Hands at the same height: the wing is placed vertically, the ear may get caught in the water leading to a fall. Differential between the two hands : at an angle that keeps the wing away from the water.
- Your first pull on the wing allowed you to stand on your own two feet. Now you have to give it fresh air and frankly push it away from you in order to compress some air by bringing it back to you again: it is called pumping. You have to stuff it with fresh air and send that air towards you. Release and start again. There are a few subtleties, but this is what you need to remember.
- As soon as you pull on the wing, the board picks up speed (in sufficient wind). So you have to lift the front foot by pulling the strap and push with the rear foot forward to accelerate the foil.
- As soon as the board leaves the water: pump very lightly without amplitude. And stop pumping the foil: focus on its flying angle that must be flat in the air.
- Don’t get carried away: keep your body fairly straight and vertical to stay in control.
Find all the steps in detail:
- Step 1 : ORGANIZE YOUR START
- Step 2 : GET ON THE BOARD
- Step 3 : GET TO YOUR KNEES
- Step 4 : GRAB YOUR WING
- Step 5 : STAND UP ON THE BOARD
- Step 6 : LAUNCH THE FLIGHT
- Step 7 : STABILIZE THE FLIGHT

