This confinement period is, for some, the opportunity to get your Board back in shape before going back to the water soon. This is the case of Kaelim who exposes his problem on our Forum and asks for advice on the procedure to follow for an efficient repair.
“Hello,
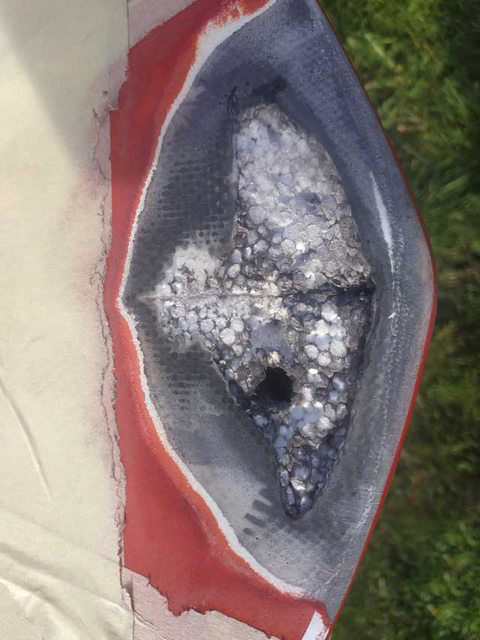
Because of the confinement, I decided to repair myself my Zero which has a water intake around the Fin Box, and two de-laminations at the tail and nose.
It is true that I could leave my Board with a Shaper, but I am more than 400 km from the first Shaper. I had time to order resin on the internet and fiber… here I go.”
Here’s L’Ours answer about delaminating :
Hello,
You’re just going to have to do it like the Fins boxes, only easier:
1/ You have to sand down the entire unhealthy area in a bowled shape. The purpose of this sanding is to remove all the fibre that is loose and to finish this bowl with a nice gentle slope on the healthy fibre around it.
2/ You let dry in the shade and apply paper towels or TP on the EPS that you have just exposed.
3/ When it is perfectly dry, open the de-compression screw and repair the Board in a room without light and at a constant temperature. If the foam gets hot, it will dilate the air and explode your strat.
4/ Protect the unsanded area with painters tape.
5/ You put 3 layers of fiberglass in about 200g, 10% bigger than the bowl.
For this you prepare your pieces of Fiber that you put on a cardboard on your Board nearby.
You prepare your Epoxy Resin.
You apply a thin layer of resin with a brush over the whole bowl.
You feed all the holes generously to let the air out.
Then you apply the first layer of fibre.
You let the resin go up in this layer without doing anything for 1 minute.
Brush a thin layer of resin on the surface.
Apply the second layer and wait 1 minute.
Brush a thin layer of resin.
Apply the third coat and wait 1 minute.
Brush a thin layer of resin on the surface.
6/ Keep an eye on it for 1 hour that no bubble lifts up your strat. If a bubble appears, you press on it with your brush to make it disappear through the fiber.
7/ 24 hours later you sand perfectly flat until you remove the protective tape, with 80/120/180/240 grain and in this order. This is the sign that you are back to level zero. Fundamental.
8/ You put back the protective tape and put a layer of epoxy resin over your strat to make a hot coat.
9/ 24 hours later you sand with 120/240/400 until you get a perfect finish.
10/ You can use a bodywork putty to redo a top coat before painting and eliminate all pores and scratches. But if your sanding is good, no need.
11/ All that’s left is to paint properly. To do this, mask the areas to be protected and apply ten very thin coats. Rushing will be your worst enemy. It’s better to apply ten thin coats than three thick ones that will remain soft.
Thank you.
PS: by doing this repair flush with the vertical rail at the tail, you remove a large part of the reinforcement composed of the lapping (covering the layers of deck and hull that cross each other). It may be a good idea to push the repair to the middle of the rail or more to cover the top fiber layers with the layers of your repair. Again, you make a trough half the thickness of the layers of the sound rail to fuse the gaps. This way your tail will be very solid and will not burst on the first impact.
Advisor : l’Ours and GONG-GALAXY.


